One of the defining features of a single page application is its manipulation of the DOM tree. Instead of serving a whole new page every time a user navigates, whole sections of the DOM appear and disappear according to the application state. In this chapter we'll to look at how Angular manipulates the DOM and how we can do it ourselves in our own directives.
In this chapter we will
- learn what structural directives are
- study ngIf
- discover the <template> element
- understand the asterisk (*) in *ngFor
- write our own structural directive
What are structural directives?
There are three kinds of Angular directives:
- Components
- Attribute directives
- Structural directives
The Component is really a directive with a template. It's the most common of the three directives and we write lots of them as we build our application.
The Attribute directive changes the appearance or behavior of an element. The built-in NgStyle directive, for example, can change several element styles at the same time. We can use it to render text bold, italic, and lime green by binding to a component property that requests such a sickening result.
A Structural directive changes the DOM layout by adding and removing DOM elements. We've seen three of the built-in structural directives in other chapters: ngIf, ngSwitch and ngFor.
NgIf Case Study
Let’s focus on ngIf. It's a great example of a structural
directive: it takes a boolean and makes an entire chunk of DOM appear
or disappear.
The ngIf directive does not hide the element.
Using browser developer tools we can see that, when the condition is true, the top
paragraph is in the DOM and the bottom disused paragraph is completely
absent from the DOM! In its place are empty <script> tags.
Why remove rather than hide?
We could hide the unwanted paragraph by setting its css display style to none.
The element would remain in the DOM while invisible. Instead we removed it with ngIf.
The difference matters. When we hide an element, the component's behavior continues. It remains attached to its DOM element. It continues to listen to events. Angular keeps checking for changes that could affect data bindings. Whatever the component was doing it keeps doing.
Although invisible, the component — and all of its descendent components — tie up resources that might be more useful elsewhere. The performance and memory burden can be substantial and the user may not benefit at all.
On the positive side, showing the element again is very quick. The component's previous state is preserved and ready to display. The component doesn't re-initialize — an operation that could be expensive.
ngIf is different.
Setting ngIf to false does affect the component's resource consumption.
Angular removes the element from DOM, stops change detection for the associated component,
detaches it from DOM events (the attachments that it made) and destroys the component.
The component can be garbage-collected (we hope) and free up memory.
Components often have child components which themselves have children.
All of them are destroyed when ngIf destroys the common ancestor.
This cleanup effort is usually a good thing.
Of course it isn't always a good thing. It might be a bad thing if we need that particular component again soon.
The component's state might be expensive to re-construct.
When ngIf becomes true again, Angular recreates the component and its subtree.
Angular runs every component's initialization logic again. That could be expensive ... as when
a component re-fetches data that had been in memory just moments ago.
Design thought: minimize initialization effort and consider caching state in a companion service.
Although there are pros and cons to each approach,
in general it is best to use ngIf to remove unwanted components rather than
hide them.
These same considerations apply to every structural directive, whether built-in or custom. We should ask ourselves — and the users of our directives — to think carefully about the consequences of adding and removing elements and of creating and destroying components.
Let's see these dynamics at work. For fun, we'll stack the deck against
our recommendation and consider a component called heavy-loader that
pretends to load a ton of data when initialized.
We'll display two instances of the component. We toggle the visibility of the first one with CSS.
We toggle the second into and out of the DOM with ngIf.
We also log when a component is created or destroyed
using the built-in ngOnInit and ngOnDestroy lifecycle hooks.
Here it is in action:
Both components are in the DOM at the start. First we toggle the component's visibility repeatedly. The component never leaves the DOM. When visible it's always the same instance and the log is quiet.
Then we toggle the second component with ngIf.
We create a new instance every time and the log shows that we're paying
a heavy price to create and destroy it.
If we really expected to "wink" the component like this, toggling visibility would be the better choice.
In most UIs, when we "close" a component we're unlikely see it again for a long time, if ever.
The ngIf would be preferred in that case.
The <template> tag
Structural directives, like ngIf, do their magic by using the
HTML 5 template tag.
Outside of an Angular app, the <template> tag's default CSS display property is none.
It's contents are invisible within
a hidden document fragment.
Inside of an app, Angular removes the<template> tags and their children.
The contents are gone — but not forgotten as we'll see soon.
We can confirm these effects by wrapping the middle "hip" of the phrase "Hip! Hip! Hooray!" within a <template> tag.
The display is a 'Hip!' short of perfect enthusiasm. The DOM effects are different when Angular is control.
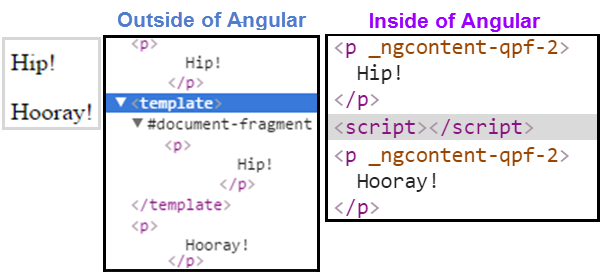
Evidently Angular replaces the <template> tag and its contents with empty <script> tags.
That's just its default behavior.
It can do something different as we saw when applying a variety of ngSwitch directives to <template> tags:
When one of those ngSwitch conditions is true, Angular inserts the template's content into the DOM.
What does this have to do with ngIf and ngFor? We didn't use a <template> tag with those directives.
The asterisk (*) effect
Here are those directives again. See the difference?
We're prefixing these directive names with an asterisk (*).
The asterisk is "syntactic sugar". It simplifies ngIf and ngFor for both the writer and the reader.
Under the hood, Angular replaces the asterisk version with a more verbose <template> form.
The next two ngIf examples are effectively the same and we may write in either style:
Most of us would rather write in style (A).
It's worth knowing that Angular expands style (A) into style (B).
It moves the paragraph and its contents inside a <template> tag.
It moves the directive up to the <template> tag where it becomes a property binding,
surrounded in square brackets. The boolean value of the host component's condition property
determines whether the templated content is displayed or not.
Angular transforms *ngFor in a similar manner:
The basic pattern is the same: create a <template>, relocate the content,
and move the directive onto the <template>.
There are extra nuances stemming from
Angular's ngFor micro-syntax which expands
into an additional ngForOf property binding (the iterable) and
the #hero local template variable
(the current item in each iteration).
Make a structural directive
Let's write our own structural directive, an Unless directive, the not-so-evil twin of ngIf.
Unlike ngIf which displays the template content when true,
our directive displays the content when the condition is false.
Creating a directive is similar to creating a component.
import the
Directivedecorator.add a CSS attribute selector (in brackets) that identifies our directive.
specify the name of the public
inputproperty for binding (typically the name of the directive itself).apply the decorator to our implementation class.
Here is how we begin:
Selector brackets [ ]
The CSS syntax for selecting an attribute is a name in square brackets. We surround our directive name in square brackets. See Directive configuration on the cheatsheet.
Selector name prefixes
We recommend picking a selector name with a prefix to ensure that it cannot conflict with any standard HTML attribute, now or in the future.
We do not prefix our unless directive name with ng.
That prefix belongs to Angular and
we don't want to confuse our directives with their directives.
Our prefix is my.
We'll need access to the template and something that can render its contents.
We access the template with a TemplateRef. The renderer is a ViewContainerRef.
We inject both into our constructor as private variables.
The consumer of our directive will bind a true | false value to our directive's myUnless input property.
The directive adds or removes the template based on that value.
Let's add the myUnless property now as a setter-only
definedProperty.
The @Input() annotation marks this property as an input for the directive.
Nothing fancy here: if the condition is false, we render the template, otherwise we clear the element content.
The end result should look like below:
Now we add it to the directivesarray of the host component and try it.
First we add some test HTML to the template:
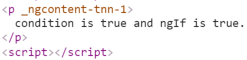
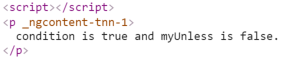
We run it and it behaves as expected, doing the opposite of ngIf.
When condition is true, the top paragraph is removed (replaced by <script> tags) and the bottom paragraph appears.
Our myUnless directive is dead simple. Surely we left something out.
Surely ngIf is more complex?
Look at the source code. It's well documented and we shouldn't be shy about consulting the source when we want to know how something works.
ngIf isn't much different! There are a few
additional checks to improve performance (don't clear or recreate the
view unless necessary) but otherwise it's much the same.
Wrap up
Here is the pertinent source for this chapter.
We learned that we can manipulate our HTML layout with
structural directives like ngFor and ngIf and we
wrote our own structural directive, myUnless, to do something similar.
Angular offers more sophisticated techniques for managing layout such as structural components that can take external content and incorporate that content within their own templates. Tab and tab pane controls are good examples.
We'll learn about structural components in a future chapter.