Displaying Component Properties
We typically display data in Angular by binding controls in an HTML template to properties of an Angular Component.
In this chapter, we'll create a component with a list of heroes. Each hero has a name. We'll display the list of hero names and conditionally show a selected hero in a detail area below the list.
Our final UI looks like this:
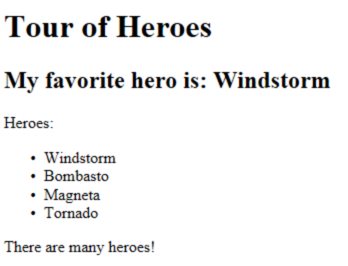
Showing component properties with interpolation
The easiest way to display a component property
is to bind the property name through interpolation.
With interpolation, we put the property name in the view template, enclosed in double curly braces: {{myHero}}.
Let's build a small illustrative example together.
Create a new project folder (displaying-data) and follow the steps in the QuickStart.
Then modify the app.component.ts file by changing the template and the body of the component.
When we're done, it should look like this:
We added two properties to the formerly empty component: title and myHero.
Our revised template displays the two component properties using the double curly brace interpolation:
The template is a multi-line string within ECMAScript 2015 back-tics (`). The back-tick (`) is not the same character as a single quote ('). It has many nice features. The feature we're exploiting is the ability to compose the string over several lines which makes for much more readable HTML.
Angular automatically pulls the value of the title and myHero properties from the component and
inserts those values into the browser. Angular will update the display
when these properties change.
More precisely, the re-display occurs after some kind of asynchronous event related to
the view such as a keystroke, a timer completion, or an asynch XHR response.
We don't have those in this sample.
But then the properties aren't changing on their own either. For the moment we must operate on faith.
Notice that we haven't called new to create an instance of the AppComponent class.
Angular is creating an instance for us. How?
Notice the CSS selector in the @Component decorator that specifies an element named "my-app".
Remember back in QuickStart that we added the <my-app> element to the body of our index.html
When we bootstrap with the AppComponent class (see boot.ts), Angular looks for a <my-app>
in the index.html, finds it, instantiates an instance of AppComponent, and renders it
inside the <my-app> tag.
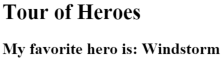
We're ready to see changes in a running app by firing up the npm script that both compiles and serves our applications while watching for changes.
We should see the title and hero name:
Let's review some of the choices we made and consider alternatives.
Template inline or template file?
We can store our component's template in one of two places.
We can define it "inline" using the template property as we do here.
Or we can define the template in a separate HTML file and link to it in
the component metadata using the @Component decorator's templateUrl property.
We're using the inline style because the template is small and it makes for clearer demonstration. The choice between them is a matter of taste, circumstances, and organization policy.
In either style, the template data bindings have the same access to the component's properties.
Constructor or variable initialization?
We initialized our component properties using variable assignment. This is a wonderfully concise and compact technique.
Some folks prefer to declare the properties and initialize them within a constructor like this:
That's fine too. The choice between them is a matter of taste and organization policy. We'll adopt the more terse "variable assignment" style in this chapter simply because there will be less code to read.
Showing an array property with NgFor
We want to display a list of heroes. We begin by adding a mock heroes name array to the component,
just above myHero and redefine myHero to be the first name in the array.
Now we use the Angular NgFor "repeater" Directive in the template to display
each item in the heroes list.
Our presentation is the familiar HTML unordered list with <ul> and <li> tags. Let's focus on the <li> tag.
We added a somewhat mysterious *ngFor to the <li> element.
That's the Angular "repeater" directive.
It's presence on the <li> tag marks that <li> element (and its children) as the "repeater template".
Don't forget the leading asterisk (*) in front of *ngFor. It is an essential part of the syntax.
Learn more about this and NgFor in the Template Syntax chapter.
Notice the #hero in the NgFor double-quoted instruction.
The #hero is a "template local variable" declaration.
The (#) prefix declares a local variable name named hero.
Angular will duplicate the <li> for each item in the list, setting the hero variable
to the item (the hero) in the current iteration. Angular uses that variable as the
context for the interpolation in the double curly braces.
We happened to give NgFor an array to display.
In fact, NgFor can repeat items for any iterable
object.
Assuming we're still running under the npm go command,
we should see heroes appearing in an unordered list.

Creating a class for the data
We are defining our data directly inside our component. That's fine for a demo but certainly isn't a best practice. It's not even a good practice. Although we won't do anything about that in this chapter, we'll make a mental note to fix this down the road.
At the moment, we're binding to an array of strings. We do that occasionally in real applications but most of the time we're displaying objects, potentially instances of classes.
Let's turn our array of hero names into an array of Hero objects. For that we'll need a `Hero' class.
Create a new file in the app/ folder called hero.ts with the following short bit of code.
We've defined a class with a constructor and two properties: id and name.
If we are new to TypeScript, it may not look like we have properties. But we do. We're taking advantage of a TypeScript short-cut in our declaration of the constructor parameters.
Consider the first parameter:
That brief syntax simultaneously
- declares a constructor parameter and its type
- declare a public property of the same name
- initializes that property with the corresponding argument when we "new" an instance of the class.
Use the Hero class
Let's redefine the heroes property in our component to return an array of these Heroes
and also set the myHero property with the first of these mock heroes.
We'll have to update the template.
At the moment it displays the entire hero object which used to be a string value.
Let's fix that so we interpolate the hero.name property
Our display looks the same but we know how much better it is under the hood.
Conditional display with NgIf
Sometimes the app should display a view or a portion of a view only under prescribed circumstances.
In our example, we'd like to display a message if we have a large number of heroes ... say more than 3.
The Angular NgIf directive will insert or remove an element based on a truthy/falsey condition.
We can see it in action by adding the following paragraph at the bottom of the template:
Don't forget the leading asterisk (*) in front of *ngIf. It is an essential part of the syntax.
Learn more about this and NgIf in the Template Syntax chapter.
The template expression inside the double quotes looks much like JavaScript and it is much like JavaScript. When the component's list of heroes has more than 3 items, Angular adds the paragraph to the DOM and the message appears. If there were 3 or fewer items, Angular omits the paragraph and there is no message.
Angular isn't showing and hiding the message. It is adding and removing the paragraph element from the DOM. That hardly matters here. It would matter a great deal from a performance perspective if we were conditionally including or excluding a big chunk of HTML with many data bindings.
Try it out. We have four items in the array so the message should appear.
Go back into app.component.ts and delete or comment out one of the elements from the hero array.
The browser should refresh automatically and the message should disappear.
Play with it.
Summary
Now we know how to
- use interpolation with the double curly braces to display a component property,
- use
NgForto display a list of items, - use a TypeScript class to shape the model data for our component and display properties of that model,
- use
NgIfto conditionally display a chunk of HTML based on a boolean expression.
Our final code:
Next Steps
In addition to displaying data, most applications need to respond to user input. Learn about that in the User Input chapter.