We’ll write our tests with the Jasmine test framework. We’ll start by getting some tests to work - any tests at all.
We will learn
- basic Jasmine testing skills
- to run our tests in the browser
- to write simple Jasmine tests in TypeScript
- to debug a test in the browser
Create a new project folder perhaps called angular2-unit-testing.
Install npm packages locally
Next follow all of the steps prescribed in “Install npm packages locally” of the QuickStart.
We’ll also add the Jasmine package via npm:
npm install jasmine-core --save-dev --save-exactBe sure to install jasmine-core , not jasmine!
Create a sub-folder src for our tests and then cd into it.
We are going to display and control our tests in the browser.
The browser is nice during development of a few tests. It’s not the best venue for working with a lot of tests and it won’t do at all for build automation. We’ll switch to the karma test-runner when the time comes. But the browser will do for now.
Create a new file calledunit-tests.html and enter the following:
<html>
<head>
  <title>1st Jasmine Tests</title>
  <link rel="stylesheet" href="../node_modules/jasmine-core/lib/jasmine-core/jasmine.css">

  <script src="../node_modules/jasmine-core/lib/jasmine-core/jasmine.js"></script>
  <script src="../node_modules/jasmine-core/lib/jasmine-core/jasmine-html.js"></script>
  <script src="../node_modules/jasmine-core/lib/jasmine-core/boot.js"></script>
</head>

<body>
</body>

</html>
In the head we have three Jasmine scripts and one Jasmine css file. That’s the foundation for running any tests.
We’ll write our first test with inline JavaScript inside the body tag:
<script>
  it('true is true', function(){ expect(true).toEqual(true); });
</script>
Now open unit-tests.html in a browser and see the Jasmine HTML test output:
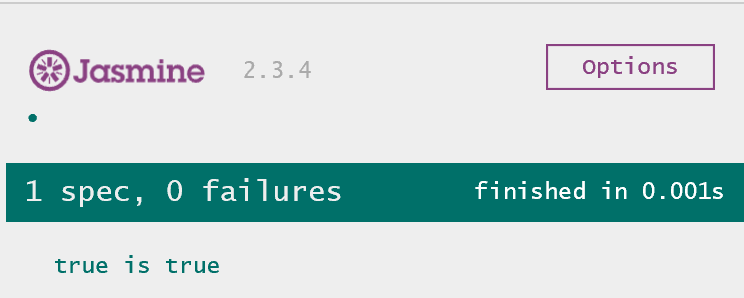
It doesn’t get much simpler than that!
First TypeScript Test
Perhaps too simple. We won’t write our entire test suite inside one HTML file.
Let’s extract that line of test code to a new file in src called 1st.spec.ts .
Among Jasmine developers, a test is known as a “spec” and test filenames include the word “spec”. We’ll stick with that convention.
The test we wrote is valid TypeScript because any JavaScript is valid TypeScript. But let’s make it more modern with an arrow function:
it('true is true', () => expect(true).toEqual(true));
Now modify unit-tests.html to load the script:
<script src="1st.spec.js"></script>
Hold on! We wrote a TypeScript file but we’re loading a JavaScript file?
That’s a reminder that we need to compile our TypeScript test files as we do our TypeScript application files. Do that next.
Prepare for TypeScript
As we’ve seen before, we first have to tell the compiler how to compile our TypeScript files with
a tsconfig.json .
We can copy one from an application we wrote previously and paste it into our src sub-folder. It should look something like this:
{
  "compilerOptions": {
    "target": "ES5",
    "module": "commonjs",
    "sourceMap": true,
    "emitDecoratorMetadata": true,
    "experimentalDecorators": true
  }
}
Compile and Run
Compile in the terminal window using the npm script command
npm run tscOur editor and the compiler may complain that they don’t know
what it and expect are because they lack the typing files that describe Jasmine.
We can ignore those annoying complaints for now as they are harmless.
If we reload the browser, we should see the same Jasmine test-runner output as before.
We’ll be evolving these tests rapidly and it would be nice to have the browser refresh automatically as we make changes and recompile.
Let’s launch with live-server in a second terminal window:
npm startNow navigate to 1st-tests.html
We should get the same Jasmine test-runner output as before.
Add a describe and another test
We can’t tell what file produced these test results. We only have one file at the moment but soon we’ll write more.
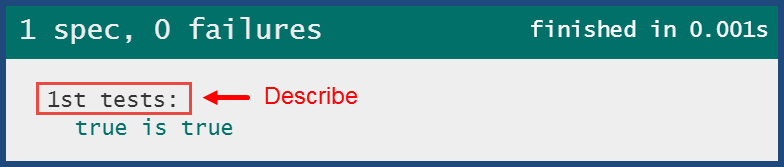
We should wrap this test into something that identifies the file. In Jasmine that “something” is a describe function. Every test file should have at least one describe that identifies the file holding the test(s).
Here’s what our revised 1st.spec.ts looks like when wrapped in a describe:
describe('1st tests', () => {

  it('true is true', () => expect(true).toEqual(true));

});
And here’s how the test report displays it.
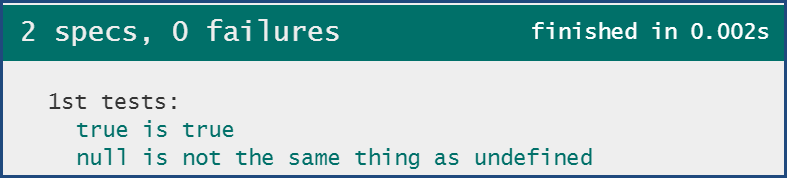
Let’s add another Jasmine test to 1st.spec.ts
it('null is not the same thing as undefined',
  () => expect(null).not.toEqual(undefined)
);
You knew that right? Let’s prove it with this test. The browser should refresh after you paste that test, and show:
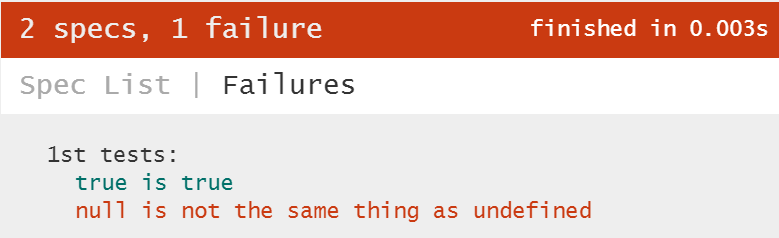
What does a failing test look like? Remove the .not. The browser refreshes and shows:
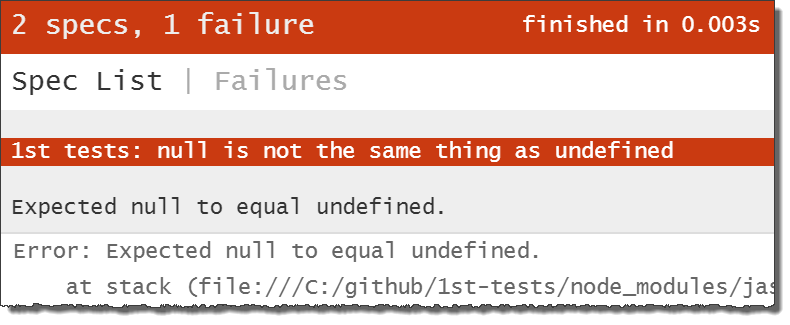
Click the Spec List link just below “2 specs, 1 failure” to see the summary again:
We can re-run just the failing test by double-clicking it. Try it!
Debug the test
Suppose we didn’t know what was going on. We can debug it in the browser.
- Open the browser’s “Developer Tools” (F12 or Ctrl-Shift-I).
- Pick the “sources” section
- Open the
1st.spec.tstest file (Ctrl-P, then start typing the name of the file). - Set a breakpoint on the second line of the failing test
- Refresh the browser … and it stops at our breakpoint.
- Open the console window at the bottom (press Esc)
- Type
null === undefined… … and we should see this:
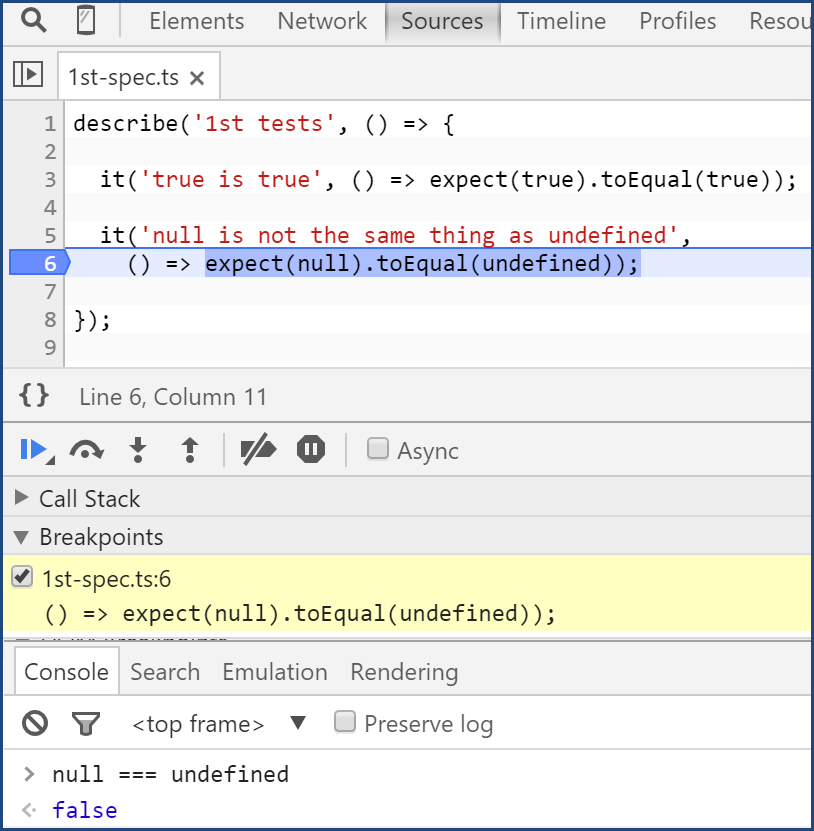
How about that! They really aren’t equal.
- remove the breakpoint (right-click in the “Breakpoints” section and chose “Remove breakpoint”)
- Click the “play” icon to resume the test (or F8)
And the test finishes. Close the browser tools (click the close box or press F12 or Ctrl-Shift-I)
Fix the test (restore the .not); the browser should refresh automatically and all tests pass.
Congratulations … you’ve completed Jasmine testing 101.
What’s Next?
Now that we’re familiar with Jasmine on its own, we’re ready to test an application.
What application? We introduce you to it in the next chapter.