In this chapter we’ll setup the environment for testing our sample application and write a few easy Jasmine tests of the app’s simplest parts. We'll learn:
- to test one of our application classes
- why we prefer our test files to be next to their corresponding source files
- to run tests with an
npmcommand - load the test file with systemJS
The Unit Testing chapters build upon each other. We recommend reading them in order.
We're also assuming that you're already comfortable with basic Angular 2 concepts and the tools
we introduced in the QuickStart and
the Tour of Heroes tutorial
such as npm, gulp, and live-server.
Create the test-runner HTML
Step away from the Jasmine 101 folder and turn to the root folder of the application that we downloaded in the previous chapter.
Locate the src folder that contains the application index.html
Create a new, sibling HTML file, unit-tests.html and copy over the same basic material from the unit-tests.html in the Jasmine 101 chapter.
<html>
<head>
  <title>1st Jasmine Tests</title>
  <link rel="stylesheet" href="../node_modules/jasmine-core/lib/jasmine-core/jasmine.css">

  <script src="../node_modules/jasmine-core/lib/jasmine-core/jasmine.js"></script>
  <script src="../node_modules/jasmine-core/lib/jasmine-core/jasmine-html.js"></script>
  <script src="../node_modules/jasmine-core/lib/jasmine-core/boot.js"></script>
</head>

<body>
</body>

</html>
We’re picking up right where we left off. All we’ve done is change the title.
Update package.json for testing
We’ll assume that the application has package.json file that looks more or less like
the one we prescribed in the in the “Install npm packages locally” section of the
QuickStart.
We must install the Jasmine package as well:
npm install jasmine-core --save-dev --save-exactjasmine-core , not jasmine!Let’s make one more change to the package.json script commands.
Open the package.json and scroll to the scripts node. Look for the command named test. Change it to:
"test": "live-server --open=src/unit-tests.html"
That command will launch live-server and open a browser to the unit-tests.html page we just wrote.
First app tests
Believe it or not … we could start testing some of our app right away. For example, we can test the Hero class:
let nextId = 30;

export class Hero {
  constructor(
    public id?: number,
    public name?: string,
    public power?: string,
    public alterEgo?: string
  ) {
    this.id = id || nextId++;
  }

  clone() { return Hero.clone(this); }

  static clone = (h:any) => new Hero(h.id, h.name, h.alterEgo, h.power);

  static setNextId = (next:number) => nextId = next;
}
Let’s add a couple of simple tests in the <body> element.
First, we’ll load the JavaScript file that defines the Hero class.
<!-- load the application's Hero definition -->
<script src="app/hero.js"></script>
Next, we’ll add an inline script element with the Herotests themselves
<script>
  // Demo only!
  describe('Hero', function() {

    it('has name given in the constructor', function() {
      var hero = new Hero(1, 'Super Cat');
      expect(hero.name).toEqual('Super Cat');
    });

    it('has the id given in the constructor', function() {
      var hero = new Hero(1, 'Super Cat');
      expect(hero.id).toEqual(1);
    });

  });
</script>
That’s the basic Jasmine we learned back in “Jasmine 101”.
Notice that we surrounded our tests with describe('Hero') .
By convention, our test always begin with a describe that identifies the application part under test.
The description should be sufficient to identify the tested application part and its source file. Almost any convention will do as long as you and your team follow it consistently and are never confused.
Run the tests
Open one terminal window and run the watching compiler command: npm run tsc
Open another terminal window and run live-server: npm test
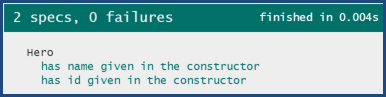
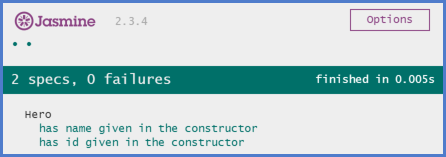
The browser should launch and display the two passing tests:
Critique
Is this Hero class even worth testing? It’s essentially a property bag with almost no logic. Maybe we should have tested the cloning feature. Maybe we should have tested id generation. We didn’t bother because there wasn’t much to learn by doing that.
It’s more important to take note of the //Demo only comment in the unit-tests.html.
We’ll never write real tests in the HTML this way. It’s nice that we can write some of our application tests directly in the HTML. But dumping all of our tests into HTML is not sustainable and even if we didn’t mind that approach, we could only test a tiny fraction of our app this way.
We need to relocate these tests to a separate file. Let’s do that next.
Where do tests go?
Some people like to keep their tests in a tests folder parallel to the application source folder.
We are not those people. We like our unit tests to be close to the source code that they test. We prefer this approach because
- The tests are easy to find
- We see at a glance if an application part lacks tests.
- Nearby tests can teach us about how the part works; they express the developers intention and reveal how the developer thinks the part should behave under a variety of circumstances.
- When we move the source (inevitable), we remember to move the test.
- When we rename the source file (inevitable), we remember to rename the test file.
We can’t think of a downside. The server doesn’t care where they are. They are easy to find and distinguish from application files when named conventionally.
You may put your tests elsewhere if you wish. We’re putting ours inside the app, next to the source files that they test.
First spec file
Create a new file, hero.spec.ts in src/app next to hero.ts.
Notice the “.spec” suffix in the test file’s filename, appended to the name of the file holding the application part we’re testing.
Move the tests we just wrote inunit-tests.html to hero.spec.ts and convert them from JavaScript into TypeScript:
import {Hero} from './hero';

describe('Hero', () => {

  it('has name given in the constructor', () => {
    let hero = new Hero(1, 'Super Cat');
    expect(hero.name).toEqual('Super Cat');
  });

  it('has id given in the constructor', () => {
    let hero = new Hero(1, 'Super Cat');
    expect(hero.id).toEqual(1);
  });
})
Import the part we’re testing
During our conversion to TypeScript, we added an import {Hero} from './hero' statement.
If we forgot this import, a TypeScript-aware editor would warn us, with a squiggly red underline, that it can’t find the definition of the Hero class.
TypeScript doesn’t know what a Hero is. It doesn’t know about the script tag back in the unit-tests.html that loads the hero.js file.
Update unit-tests.html
Next we update the unit-tests.html with a reference to our new hero-spec.ts file. Delete the inline test code. The revised pertinent HTML looks like this:
Run and Fail
Look over at the browser (live-server will have reloaded it). The browser displays
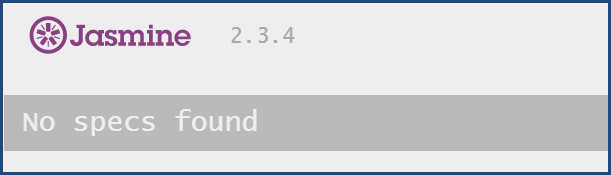
That’s Jasmine saying “things are so bad that I’m not running any tests.”
Open the browser’s Developer Tools (F12, Ctrl-Shift-i). There’s an error:
Load tests with systemjs
The immediate cause of the error is the export statement in hero.ts.
That error was there all along.
It wasn’t a problem until we tried to import the Hero class in our tests.
Our test environment lacks support for module loading. Apparently we can’t simply load our application and test scripts like we do with 3rd party JavaScript libraries.
We are committed to module loading in our application.
Our app will call import. Our tests must do so too.
We add module loading support in four steps:
- add the systemjs module management library
- configure systemjs to look for JavaScript files by default
- import our test files
- tell Jasmine to run the imported tests
These steps are all clearly visible, in exactly that order, in the following lines that
replace the <body> contents in unit-tests.html:
<body>
  <!-- #1. add the system.js library -->
  <script src="../node_modules/systemjs/dist/system.src.js"></script>

  <script>
    // #2. Configure systemjs to use the .js extension
    //     for imports from the app folder
    System.config({
      packages: {
        'app': {defaultExtension: 'js'}
      }
    });

    // #3. Import the spec file explicitly
    System.import('app/hero.spec')

      // #4. wait for all imports to load ...
      //     then re-execute `window.onload` which
      //     triggers the Jasmine test-runner start
      //     or explain what went wrong
      .then(window.onload)
      .catch(console.error.bind(console));
  </script>
</body>
Look in the browser window. Our tests pass once again.
Observations
System.config
System.js demands that we specify a default extension for the filenames that correspond to whatever it is asked to import.
Without that default, it would translate an import statement such as import {Hero} from ‘./here’ to a request for the file named hero.
Not hero.js. Just plain hero. Our server error with “404 - not found” because it doesn’t have a file of that name.
Once configured with a default extension of ‘js’, Systemjs requests hero.js which does exist and is promptly returned by our server.
Asynchronous System.import
The call to System.import shouldn’t surprise us but it’s asynchronous nature might.
If we ponder this for a moment, we realize that it must be asynchronous because
System.js may have to fetch the corresponding JavaScript file from the server.
Accordingly, System.import returns a promise and we must wait for that promise to resolve.
Only then can Jasmine start evaluating the imported tests.
window.onload
Jasmine doesn’t have a start method. It wires its own start to the browser window’s load event.
That makes sense if we’re loading our tests with script tags.
The browser raises the load event when it finishes loading all scripts.
But we’re not loading test scripts inline anymore.
We’re using the systemjs module loader and it won’t be done until long after the browser raised the load event.
Meanwhile, Jasmine started and ran to completion … with no tests to evaluate … before the import completed.
So we must wait until the import completes and only then call the window onLoad handler.
Jasmine re-starts, this time with our imported test queued up.
What’s Next?
We are able to test a part of our application with simple Jasmine tests. The part was a stand-alone class that made no mention or use of Angular.
That’s not rare but it’s not typical either. Most of our application parts make some use of the Angular framework.
In the next chapter, we’ll test a class that does rely on Angular.