Displaying controller properties
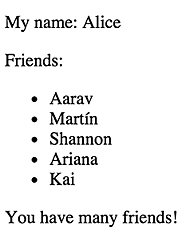
Let's walk through how we'd display a property, a list of properties, and then conditionally show content based on state. We'll end up with a UI that looks like this:
Although we work through the examples in TypeScript, you can also use
regular ES5. Click the ES5 link in any code box to see the ES5 JavaScript
version. Note that in ES5, you'd want to name your files .js rather than
.ts.
Create an entry point
Open your favorite editor and create a show-properties.html file with the content:
The <display> component here acts as the site where you'll insert your application.
We'll assume a structure like this for the rest of the examples here and just focus on the parts that
are different.
Showing properties with interpolation
The simple method for binding text into templates is through interpolation where you put the name of a property inside {{ }}.
To see this working, create another file, show-properties.ts, and add the following:
You've just defined a component that encompasses a view and controller for the app. The view defines a template:
My name: {{ myName }}
Angular will automatically pull the value of myName and insert it into the browser and
update it whenever it changes without work on your part.
One thing to notice here is that though you've written your DisplayComponent class, you haven't
called new to create one anywhere. By associating your class with elements named 'display' in
the DOM, Angular knows to automatically call new on DisplayComponent and bind its properties to
that part of the template.
When you're building templates, data bindings like these have access to the same scope of
properties as your controller class does. Here, your class is the DisplayComponent that has
just one property, myName.
While you've used template: to specify an inline view, for larger templates you'd
want to move them to a separate file and load them with templateUrl: instead.
Create an array property and use NgFor on the view
Moving up from a single property, create an array to display as a list.
You can then use this array in your template with the NgFor directive to create copies of DOM elements
with one for each item in the array.
To make this work, you'll also need to add the NgFor directive used by the template so
that Angular knows to include it:
Reload and you've got your list of friends!
Angular will mirror changes you make to this list over in the DOM. Add a new item and it appears in your list. Delete one and Angular deletes the <li>. Reorder items and Angular makes the corresponding reorder of the DOM list.
Let's look at the few lines that do the work again:
The way to read this is:
*ng-for: create a DOM element for each item in an iterable like an array#name: refer to individual values of the iterable as 'name'of names: the iterable to use is called 'names' in the current controller
Using this syntax, you can build UI lists from any iterable object.
Create a class for the array property and inject into component
Before we get too much further, we should mention that putting our model (array) directly in our controller isn't proper form. We should separate the concerns by having another class serve the role of model and inject it into the controller.
Make a FriendsService class to provide the model with the list of friends.
Now replace the current list of friends in DisplayComponent by including the FriendsService in the injectables list, then including the service in the constructor, and finally setting the list of names in DisplayComponent to the names provided by the service you passed in.
The dependency injection syntax here is using the low-level API and is...well...not very nice. We're working on sugaring the syntax to match the way it works in Angular 1. Expect this to change soon.
Conditionally displaying data with NgIf
Lastly, before we move on, let's handle showing parts of our UI conditionally with NgIf. The
NgIf directive adds or removes elements from the DOM based on the expression you provide.
See it in action by adding a paragraph at the end of your template
<p *ng-if="names.length > 3">You have many friends!</p>You'll also need to add the NgIf directive so Angular knows to include it.
As there are currently 6 items in the list, you'll see the message congratulating you on your many friends. Remove three items from the list, reload your browser, and see that the message no longer displays.